Tuesday, December 28, 2010

Cake Pops - Adventure #5 with a Few Friends

A few friends and I became adventurous and wanted to try some of the cake pops projects found in the Cake Pops book.  They are not the best things we have done, but not too bad for first timers. 

Pandas made by Jaime

Minnie Mouse silhouettes made  by Lauren, Pirates made by me

Chicks and Sheep by me

Some Mickey Mouse ears

Some cake balls made from some left over candy coating

Christmas Cake Balls - Adventure #4

I purchased a book for myself for Christmas - Cake Pops.  I was inspired by many of the cake projects inside.  Here are the Christmas cake balls I made for our family gathering.


Cake Ball Adventures #2

So I decided to make some cake balls for a coworkers baby shower breakfast.  This time I made two delicious flavors: red velvet and German chocolate.  This turned out quite nicely.  I even got a little creative with the German chocolates and swirled white and chocolate candy melts to coat. 


Cake Ball Adventures #1

With all the talk about cake balls and cake pops, I decided I wanted to try and make some.  Here was the disastrous result of my first try. 

Baking and rolling out the cake was the easy part. 
First you bake a 9x13 cake as you normally would.  It can be homemade or a box mix.  It does not matter. 
After letting the cake cool completely, I crumble the cake into a one gallon zip top bag. 
Next, add about a cup of icing, homemade or the canned stuff from the grocery store is fine. 
Mix thoroughly.  I usually get as much air out of the bag as possible, and then knead it. 
Using a small ice cream scooper, I scoop out enough cake and icing mixture to make a quarter size ball. 
Roll it up.  Set on wax paper on a pan or cookie sheet. 
I place my balls into the freezer until firm.  This is where it got a little crazy for me. 


For the coating, you need to use melted candy.  What you see is not icing.  Icing does not harden they way candy melts do.  I was using regular white chocolate chips for this project. Little did I know, they do not melt as smoothly as candy melts do.   They also need to be tempered.  You are suppose to be able to dip the ball into the melted candy in one motion.  Yeah, not so much for me.  As you can see below, the candy was not very smooth as all.  However, they did taste quite delicious! 


School Success Celebration

This year our administrative assistant approached me to make a celebration cake to celebrate the success of our teachers and students.  The only requirements that she gave me were that it needed to feed about 50 people (there were other desserts present), it needed to represent Meadowcreek, and include the words Sweet Success on the cake.  Here is what my I came up with:
Our mascot is the mustang and our colors are blue and white.

I created this confetti cannon for the top. 


Sunday, November 7, 2010

Pumpkin Galore!

We had a good sized pumpkin we never carved for Halloween.  I did not want it to go to waste.  While speaking with my mother, she suggested I make my own pumpkin puree.  It sounded easy enough. 
The smart thing I did was use the electric knife to slice the pumpkin open!

We had a small pie pumpkin I sliced and cleaned out as well. 

I baked the pumpkin halves for about 2 hours. 

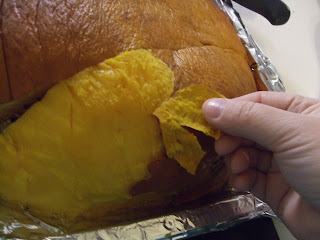
At that point the skin peels right off. 

My puree ingredients

Sliced pumpkin

18 cups of puree

I then decided to make a pumpkin bread roll with a cream cheese filling. 

The bread out of the oven

Rolled up and cooling

The cream cheese filling

Rolled up and ready to slice

Very nice!

Yummy!

Halloween Goodies

These are the goodies I made for Ian's preschool class' Halloween party. For the insects, all I did was melt cocoa candy melts, then draw them out on wax paper with a piping bag.  Before they cooled and solidified, I added the M&Ms.  I should have used a white icing, but kids always love chocolaty things. 


These are suppose to be centipedes, but the kids all called them caterpillars.

An ant

Ewww!  Ticks!

Creepy Crawly Spiders!

Sunday, October 17, 2010

This Weekend's Adventure

Monday, our school will have school bus driver appreciation day.  I made these little bites to give out to the drivers at our school.
Just like my icings, my cookies are always homemade.  These are my chocolate chip recipe, minus the chips with semi-sweet chocolate piped for wheels and the bus stripes. The yellow outline and red dots (representing stop signs) are melted candy.  They are not uniform in size (which bugs me), and the stop sign is on the wrong side (which bugs me more).  But for a first time, and having hand piped it all, I think they are super cute.  

Sunday, October 10, 2010

Rehearsal Party and Groom's Cake

Let me just start out by saying this is all a learning process for me.  I have only taken 4 Wilton classes, but I have searched the net and read tons of books for tips and techniques to help in the process.   Smoothing buttercream onto a cake is still my nemesis, as well as making fondant look smooth and not so lumpy. 

What I do very well is make things taste yummy!  My cakes can be homemade or from a mix (but I use my own directions, never the ones on the box).  On the flip side, my icings and fillings are ALWAYS homemade. 

Which leads me to the yumminess I created this week!

These were baked for a coworker of mine that got married this weekend.  She wanted some of the fabulous red velvet cupcakes for her after-rehearsal dinner gathering. 
My oven, probably being original to my home (yes, we need to upgrade the kitchen), is not the most reliable when it comes to temperature control and smaller items like cupcakes and cookies.  What I have found are these wonderful foil cupcake cups made by Reynolds.  They work beautifully, and I have not had a scorched cupcake since I began using them. 

My coworker also wanted a groom's cake.  She wanted a devil's food cake with an oreo buttercream filling and cream cheese icing.  The decorations were to be Georgia Tech related.   Now, I have made oreo buttercream filling before.  It is always super good.  For some reason, this time it turned out better than ever.  No difference in my recipe.  I have no explanation. 
I had some difficulty with the decorations in the beginning.  Because it was a groom's cake, I didn't want it to be all girly.  I was trying to get some yellow and black rhombi on the side of the cake (think argyle socks). That did not work out too well due to the process needing precise measurements, a perfectly flat sided cake, and a less ambitious design.  So, I ended up pulling it off the cake, making a new batch of icing, and starting over (at 10PM).  Here is what I ended up with.

Originally the GT and Buzz were royal color flow.  They did not dry in time to put on the cake.  So I had to cut them out free hand from fondant.  It actually looked better in fondant anyway.  The oreos were left over from the filling.  I tried to give it a wax melt look with the yellow icing.  Some of it worked, some not so well.  All said and done, I think it turned out well.